Sunday, October 30, 2011

Day 31: Halloween cupcakes

I can't believe it's day 31 and I actually managed to blog ALL 31 days!!  This was definitely trying at times and there were most certainly days where I wanted to just skip posting, but I managed to get past it and post something everyday. 

This was something I needed to do.  Not anything to do with blogging, but I needed this lesson in perseverance and willpower.  I have really struggled with that lately and it has come across in my weight and in my relationship with the Lord.

[Wow...this just got heavy for a blog series about baking!]

Now I'm motivated to get into gear!!

Ok, now onto the baking!  If you're in need of a last minute Halloween treat, these little cupcakes are easy peasy!

I used mini cupcakes, but you could also do full size cupcakes.  I iced it with a round tip making a tall peak.  If you don't have cake tips, you could also use a freezer bag.  For the eyes, I used MINI-chocolate chips found in the baking section at your local grocery store.


You don't need Ghostbusters for these little guys!  I'm sure they'll get gone in a hurry!

Thank you so much to those who followed me this month.  I do NOT claim to be an excellent baker.  I have just found a few tips that I want to share along with you.  Thank you to The Nester for hosting the 31 Day Challenge.

Saturday, October 29, 2011

Day 30: Crescent roll goodies

I'm deviating a little from cake decorating today to share this simple treat that you could also use with any chocolate Halloween candy you'll get this weekend.

Unroll a crescent roll and put candy on the large end. Roll up, pinch dough together to seal in the candy and cook according to package.


Imagine the deliciousness of using cut up Reeces Peanut Butter cups?

Friday, October 28, 2011

Saturday Stumbles

Are you all ready for Halloween weekend?  I'm going apple picking with the family so that should be fun.  Halloween seems to kick off the holiday season.  I was in Target today and they've already got Christmas stuff out!  I debated on getting a roll of Christmas wrapping paper, but I walked away.

Oven Fried Okra
I made this last week and it was delish!  Such a healthier alternative to regular fried okra.

Monster Pudding Cups
An easy, last minute Halloween treat

Halloween Lunch ideas
A fun way to spice up your kid's lunch

Link up below with your stumble worthy goodies!

Day 29: Variation to Hi Hat cupcakes

Hi hat cupcakes are something that I've always wanted to try, but they're a little intimidating to me because of melting the chocolate.  Chocolate can be tricky and it just sort of scares me a bit!

So I decided to try something a little easier...candy coating.  I've written about candy coating before to make chocolate toppers.

First melt the candy coating according to the package.  I also dyed mine with food coloring.  Next take your cupcake that's already been frosted.  You'll want to make sure to use a pastry bag to give it a nice, high peak.

Then turn your cupcake upside down and dip into the candy coating.
Slowly lift it out.  If you lift out too fast, this could happen:
Let set out to harden.
You could also decorate with sprinkles or other pieces of candy before it hardens.

Thursday, October 27, 2011

Day 28: Disposable cupcake carrier

The problem with cupcake carriers is they're bulky and hard to store.  Another problem is that most of them only carry a dozen cupcakes.  Who only takes a dozen cupcakes to a party?!

This little treasure is on my Christmas list this year.  It holds 36 cupcakes...but talk about big & bulky!


When I came across this idea, I knew it was genius.  A disposable cupcake carrier!  Now, I can't take credit for this in any way, but I just have to share it with you:

All you do is cut X's in a gift box. It will hold about 8 cupcakes. Granted it won't hold as many as some of the other containers, but what a great fix that won't take up a lot of space in your pantry.

Wednesday, October 26, 2011

Day 27: Chocolate Dipped goodies

This is for all you non-bakers out there and is a quick and simple treat. 

Start with some snacks you probably already have in your pantry.


Then melt some candy coating according to the package and dip away.
Before it hardens you can embellish with sprinkles or other candies.  Leave sitting out on wax or parchment paper.
These would be great gifts or teacher treats. 

WINNER!

Congratulations go out to...

JAZMIN WICKHAM from A Pretty Rock


She won because she tweeted the contest.

Thank you to all entered and I encourage you to go check out Mia's Pizza and Eats!  This week they're featuring a loaded baked potato pizza!!  YUM!

Tuesday, October 25, 2011

Day 26: Easy cake decorating ideas

Excused the randomness of this post, but I just wanted to share with you some ideas I've used over the years that are simple enough anyone could duplicate.

Cake topper
This is one of my favorite things to use as a cake topper especially for wedding cakes.  I like it because you can color it to match any color scheme and it can be a memento the couple can keep and use in their home.  It's simply a wooden letter (about 4" or so high) that you can get at any craft shop.  I just painted it and hot glued it to a dowel rod.


 This was for my nephew's first birthday and the "1" could still be used as a memento.

Names on cake
I was really happy with the way this turned out.  My family spent a weekend at the lake with 2 other families so I made a cake for us and I decorated it with all of our names.  The names are written in cursive around the cake.  Granted I don't have the neatest cake cursive writing, but I just love how you have to do a double-take to really see the names.


Chocolate mosaic
I used this for a friend's groom cake.  It's chocolate that I broke into pieces and just stuck to the side with frosting.  I also added chocolate shavings to the top.
What about you?  Do you have any go-to cake decorating tips?  I'd love to hear 'em!

Day 25: Rainbow/Tye Dye cake

This is a fun trick that would work great for a tye-dye party, 60's-groovy party or even a rainbow or St. Patrick's Day party.

Divide your batter into as many different colors as you're going to use.  I used 4.

Dye each container a different color using regular old food dye.
Then you just pour one container at a time into a prepared pan.  There's no wrong way to do this!


Finally just bake according to the package.

It may look a little dull when it comes out of the oven, but this part will be covered in icing.  The colors inside are beautiful!  Here I cut off the domed top.

Can you imagine what a fun surprise it would be to cut into this cake?!  Groovy, baby!

Sunday, October 23, 2011

Day 24: Monochromatic

Another easy go-to trick is to use a monochromatic color scheme.  Here I used a cupcake so the liner, batter, icing, and embellishments (which are M&M's) are all the same color.


Here are some other examples I've found on Pinterest:
 

Source: None via Staci on Pinterest


Saturday, October 22, 2011

Day 23: Cupcake toppers

This is one of my go-to decorating tricks. It's an easy way to really personalize your treats.

These were some I made for my cousin's wedding shower.  I simply made the monograms on my computer, used a circle punch to get them perfectly rounded and then just hot glued toothpicks to the back.
I also used them for a birthday party.
I made the cupcakes, but not the toppers.  These were made out of playing cards. 

The nice thing about using a cupcake topper is that it doesn't really matter what your frosting looks like because the topper is the star.  Yeah, you can buy the plastic-y type ones from the store, but making your own really adds a personal touch.

Friday, October 21, 2011

Saturday Stumbles

This was a big week for me as I celebrated a birthday.  We won't go into all the gory details of how old I turned but we'll just say it rhymes with mirty-jive.

With a busy week at work, birthday fun and being over half way finished with my baking series, I didn't stumble a whole lot this week, but here's a few things that caught my eye.

Junk You Can Toss
An article about what documents you can get away with shredding and which ones you should hang on to.

The MEAN Birthday Party
I'm all about a themed birthday and this one is super cute!  (Psst...I just would've used a different song)

Crockpot Buffalo Chicken
I hope it's as easy and good as it sounds!

Candy Corn Sugar Cookies
What a fun treat for upcoming fall parties!


So what did you stumble this week?  Please follow the guidelines then link up below.

Day 22: Large tip

If you're somewhat into baking, then you've probably used, or at least heard of, pastry tips. 


They are the metal part that goes in the end of the pastry bag that cause the icing to come out in different shapes according to the shape of the tip.  Most of them are about 1 to 1 1/2 inches tall and most of them can do the trick.

But when I came across these bigger tips, it opened up a whole new world (cue Aladdin). 

Here is what most homemade, frosted cupcakes look like:
The frosting is just spread on probably with a knife. 

Some of you maybe get more ambitious and use a tip.
Better.  But notice in both cases that the frosting is pretty much flat.  The frosting is the best part...why not use more?!

Here's my trick.  Use a large tip!
In this picture, it would be #171 or 190.  The ones in the front are the standard size, regular tips, but the large ones are about 2-3 inches and allow for more frosting.
Now doesn't this look like one you'd buy in a bakery?  And I promise that it doesn't take a whole lot of special baking skills to pull this off.  Remember my post of pastry bags?  Well, we've just added a tip to it.  It's the same technique.

Don't let it scare you!  Go for it!

Thursday, October 20, 2011

Day 21: Piping gel (a real magic trick!)

I learned this trick through a cake decorating class I took last year.  For someone who can barely draw a stick person, this is THE answer!

I'll use the same cake from yesterday.

This is what I want to draw on top of the cake.
Ok, I realize this doesn't really go with the cake...in any way.  In an attempt to find a flower of some sort, this is all I could find.  You want to find a design that is simple and not too many details.  Put a piece of parchment paper on top of your design.  Then set up your piping gel.
Piping gel is a clear, thick goo like substance (like my technical terms?!)  It is about $3- $4 at your local craft store.  Tint it with food coloring the same color as your icing.

Put it in a pastry bag with a very small tip (number 1 or 2).
Use the pastry bag to trace your design on the parchment paper.
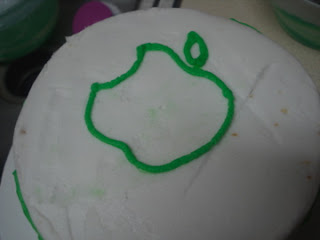
Next transfer the design onto your cake face down.
I used a small paintbrush to lightly apply pressure to make sure it stuck to the cake.  Slowly peel the parchment paper off and then use your icing, trace the design made by the piping gel.
Umm...oops!  Make sure you choose a design that, when flipped, is still the same orientation.  I don't think Apple would approve of this!

But do you see the possibilities with this?!?!  You can now add any design to a cake even with having no artistic ability!

Go out and buy some piping gel today!

Related Posts with Thumbnails