Friday, October 21, 2011

Saturday Stumbles

This was a big week for me as I celebrated a birthday.  We won't go into all the gory details of how old I turned but we'll just say it rhymes with mirty-jive.

With a busy week at work, birthday fun and being over half way finished with my baking series, I didn't stumble a whole lot this week, but here's a few things that caught my eye.

Junk You Can Toss
An article about what documents you can get away with shredding and which ones you should hang on to.

The MEAN Birthday Party
I'm all about a themed birthday and this one is super cute!  (Psst...I just would've used a different song)

Crockpot Buffalo Chicken
I hope it's as easy and good as it sounds!

Candy Corn Sugar Cookies
What a fun treat for upcoming fall parties!


So what did you stumble this week?  Please follow the guidelines then link up below.

Day 22: Large tip

If you're somewhat into baking, then you've probably used, or at least heard of, pastry tips. 


They are the metal part that goes in the end of the pastry bag that cause the icing to come out in different shapes according to the shape of the tip.  Most of them are about 1 to 1 1/2 inches tall and most of them can do the trick.

But when I came across these bigger tips, it opened up a whole new world (cue Aladdin). 

Here is what most homemade, frosted cupcakes look like:
The frosting is just spread on probably with a knife. 

Some of you maybe get more ambitious and use a tip.
Better.  But notice in both cases that the frosting is pretty much flat.  The frosting is the best part...why not use more?!

Here's my trick.  Use a large tip!
In this picture, it would be #171 or 190.  The ones in the front are the standard size, regular tips, but the large ones are about 2-3 inches and allow for more frosting.
Now doesn't this look like one you'd buy in a bakery?  And I promise that it doesn't take a whole lot of special baking skills to pull this off.  Remember my post of pastry bags?  Well, we've just added a tip to it.  It's the same technique.

Don't let it scare you!  Go for it!

Thursday, October 20, 2011

Day 21: Piping gel (a real magic trick!)

I learned this trick through a cake decorating class I took last year.  For someone who can barely draw a stick person, this is THE answer!

I'll use the same cake from yesterday.

This is what I want to draw on top of the cake.
Ok, I realize this doesn't really go with the cake...in any way.  In an attempt to find a flower of some sort, this is all I could find.  You want to find a design that is simple and not too many details.  Put a piece of parchment paper on top of your design.  Then set up your piping gel.
Piping gel is a clear, thick goo like substance (like my technical terms?!)  It is about $3- $4 at your local craft store.  Tint it with food coloring the same color as your icing.

Put it in a pastry bag with a very small tip (number 1 or 2).
Use the pastry bag to trace your design on the parchment paper.
Next transfer the design onto your cake face down.
I used a small paintbrush to lightly apply pressure to make sure it stuck to the cake.  Slowly peel the parchment paper off and then use your icing, trace the design made by the piping gel.
Umm...oops!  Make sure you choose a design that, when flipped, is still the same orientation.  I don't think Apple would approve of this!

But do you see the possibilities with this?!?!  You can now add any design to a cake even with having no artistic ability!

Go out and buy some piping gel today!

Wednesday, October 19, 2011

Day 20: Swirl design

One of my go-to cake designs is the swirl design.  At least, that's what I call it.  You don't have to be an excellent artist or cake decorator to do this and that's why I love it!

I'll be using the same cake I used yesterday.  Start with making a blob.  Like that for technical terms?  There's no rhyme or reason...just a blob.

Then next to the first one, do another blob, and another, and another..

Finish off by piping (using a pastry bag with a tip) dots around the bottom.  It really finishes off the cake.

Day 19: Smooth frosting

Yesterday we did the crumb coating on our cake and then applied the final layer of frosting.  Today, we're going to see how to get it smooth.

Here is our cake from yesterday:

Notice the little crumb...it's important.
 There are a couple different ways to smooth out your frosting, but the one that I've found to work the best is parchment paper.
It must be parchment paper.  Wax paper won't work.  Rip of a piece about the height of your cake.  Place it on the side and quickly rub your hand over almost as if you're rubbing the wrinkles out.  The heat from your hand slightly "melts" the icing and smooths out the rough spots.
Here is the same spot on the cake as the first picture:
There's that little crumb!  See...it is the same spot!

Another technique to smooth out the frosting is running your spatula under HOT water.  Wipe draw and then lightly use it to smooth over the rough spots.
Spread lightly because you don't want to move the icing.  You're just sort of flattening it out.  Of course, with most of these cake techniques it will take a few trial and errors.

Happy smoothing!

Tuesday, October 18, 2011

Mia's Pizza and Eats

Pizza seems to be the universal food when you get a group of people together, but the problem is finding a pizza that's good quality, affordable and fresh.

Well, when Mandi from Cumming Local got a group of local bloggers together at Mia's Pizza and Eats, we certainly did not have that problem!!

Owners Mike and Clori treated us to a smorgasbord of their delicious homemade pizzas, salads, appetizers and desserts.  What makes their pizzeria different from the rest is their commitment to using fresh and locally grown ingredients whenever possible. 
  • Their dough is made fresh everyday. (They also have gluten free pies)
  • They don't use any precooked or frozen meats.  All their meatballs, lasagna, chicken & beef is made from scratch.
  • Their salads are cut fresh...nothing from a bag!
  • Their bread loaves, bread crumbs and croutons are all homemade.
None of the other pizzerias can say that!  And what was most impressive to me was listening to owner, Clori,  talk about the passion she has for her restaurant.  You can tell she wants only the best for her customers. 
Mia's Pizza and Eats is also a great place for the family.  They have a patio, video games, TV's to watch the big games, free Wi-Fi, Trivia on Wednesday nights and fundraising nights. 

Join them during the month of October to celebrate National Pizza Month.  This week, October 15-21 they are featuring Panzanella pizza and October 22-28 is Loaded Baked Potato pizza, which I can not wait to try!  They're also having a pizza box art contest for kids and on Halloween, October 31, the first 40 kids under 12 who come dressed in costume and say "TRICK OR PIZZA" they'll get a free slice of cheese pizza!

Join them on Monday, October 24 for a Family Night Out event sponsored by Cumming Local.  It's a free event but the first 40 families to register get a free swag bag with all kinds of goodies.  Mia's Pizza and Eats will also be having a special discounted menu. 
If you're not convinced now that Mia's Pizza and Eats is a restaurant you've got to put on your out to eat rotation, then maybe this will convince you.  Clori gave me a $20 gift certificate to give to one of my readers! 

There are several ways to enter.  Just leave a comment for each:
  • Leave me a comment below telling me your favorite pizza toppings.
  • Follow Mia's Pizza and Eats on twitter
  • Tweet this contest: "I want to win $20 to @miaspizzaneats from @stacib"
  • Follow Cumming Local on twitter
  • Follow me on twitter
Contest ends Tuesday, October 25 and the winner will be notified by email so please make sure to leave an email address.

Be sure to find Mia's Pizza and Eats on Facebook and Twitter.

Disclosure policy: Mia's provided me with lots of delicious food (so much so that I almost had to be rolled out of the restaurant) and the $20 gift certificate to give away. 

Monday, October 17, 2011

Day 18: Crumb coat

Believe it or not, there IS a right and wrong way to ice a cake.  One of the biggest mistakes people make is not doing a crumb coat layer first.  So, allow me...

The crumb coat is done to sort of seal in all the crumbs of your cake so they don't end up in your icing and show on the cake. 

Step 1: Allow cake to cool completely.  I typically bake my cakes and let them cool over night before I ever apply the first drop of icing.  Right before I ice it, I put it in the fridge.  This stiffens it up a bit making the crumbs a little less likely to break off in your cake.

Step 2: Apply a thin, almost see-through, layer of icing to your cake. 

You will get some crumbs in your icing, but what's important here is to wipe your spatula off in a separate bowl from your icing cake.  DON'T PUT YOUR CRUMBS BACK IN THE ICING BOWL. (thank you!)
Step 3: Put back in the fridge to let the icing set up.  This means it will harden a bit and seal in the crumbs.  I let it sit for about 10 minutes.

Step 4: Now apply a thicker layer of icing.  You want to try and cover up all the crumbs in your crumb coat layer. Put back in the fridge for another 10 minutes or so.
See the difference between this one and first one?  No crumbies!

Tomorrow we're going to look at how to smooth out the icing.

Sunday, October 16, 2011

Day 17: Cupcake sandwich

We've already covered the cookie sandwich and now we're going to look at a cupcake sandwich.  These would be cute as favors for a shower or party.

First, split your cupcake into two halves.


Then, put the bottom layer in a small container.  I used the little Ziploc containers...like the little ones used for condiments.  You could also use a clear plastic cup and then put some saran wrap on the top.  Once the bottom layer is in, put your layer of frosting using a pastry bag and then place the top layer on top.
Finally, finish off with a cute ribbon or bow.

I know for a fact that these would make a great teacher gift, too! (hint, hint!)

Saturday, October 15, 2011

Day 16: Using flowers

Believe it or not, one of my first ever real cakes I made (like, for someone else!) was a wedding cake!  I can't figure out who was crazier, the girl who asked me knowing I had never done that before or ME for saying yes! 


I still cringe when I see that cake because I see every little thing wrong with it.  (Side note: the couple who this was for is no longer married...hmm...)

But I do like the flowers on the cake.  Flowers are just pretty for any occasion, but can especially bring a charm and elegance to a cake.  The problem is that you don't want to just stick flowers directly into a cake.  It's not sanitary or healthy.

To get around that, I use flower spikes.  I bought mine from my local Michael's, so I'm sure any craft store that carries cake decorating supplies would have them.  If not, you can order them online.


They are tiny straws closed off on one end that you stick into the cake.
(please ignore the blue star...I've been reusing the same cake for most of my posts on this series, but this one has had all it can take.  I'll be doing some baking this weekend!)

Next, you add a little bit of water into the spike to keep the flower fresh.  I use a dropper to put the water in once I've got the spike in.  Don't try to put the water in first, then the spike...a wet cake is no good.

Then you simply fill in with the flowers!
(You can't even see that blue star anymore, can you?!)

Granted this may take a little trial and error to get it to look the way you want.  One tip, though, is to cut the stems of your flowers shorter than you need them because you don't want them to stick up too tall to where the flower spike is showing.  And if your flower spike is taller than the cake (as is the case below) simply insert your spike at a slight angle so it will come to the same level as the icing.

What's great about using flowers is that you don't have to stress about doing an intricate design on the cake because the flowers will be the star of the show.  Kind of like the lazy girl's way of cake decorating!!


Friday, October 14, 2011

Day 15: Ideas

Today will be a combination of 31 Days and Saturday Stumbles...so welcome!

If I have to make a cake or cupcakes, one of the first things I do is scour the internet for images and ideas.  Here are some of my favorites:

i am baker

My Cake School

And Everything Sweet

Bakerella

Cupcakes Take the Cake

Wilton

If you clicked through any of those you might be intimidated, but here's how you have to think about it:  ya know how when you see a fashion runway show and the models come out wearing crazy stuff?


Well, cake and cupcake designs are the same way.  For example, when I look at the model above I like the color combination of the green and red.  I also like the ruffle texture...not necessarily on the whole entire outfit, but maybe as an accent.  So when you look through these blogs, look for parts or colors that you could incorporate into your cake.

...and just for kicks, if you've not see Cake Wrecks, you're in for a real laugh!  And you can read about how I met Jen, the author of the blog.

Read up on the guidelines and link up below!

Thursday, October 13, 2011

Day 14: Travel tip

Today's post will not exactly help you in the kitchen, but once you've made your lovely masterpiece, it will help you transport it to your grand event that will blow everyone away.

This is so simple but when I discovered this, it made my life so much easier and less stressful as I transported cupcakes, cakes and sometimes 3 to 4 tiered cakes.  Being single, it's not like I've got a husband to drive me while I hold the cake nice and steady.  Nope...I've got to set it on floorboard and pray for straight roads and light traffic.

This has changed that!

Cut out a piece of shelf liner like the kind pictured below.  You can find it any where shelf liners are sold.  It's kind of rubber-y.  This doesn't have to be neat or measured.

  Then, just place it on your floorboard and put your cake or cupcakes on top and you're now ready to take those curves at 80 miles per hour!  Although I haven't tried it, I assume it would work for casserole type dishes too.

Wednesday, October 12, 2011

Day 13: Chocolate toppers

Get ready to let your creative side come out!  Nothing fancies up a cake or cupcake like chocolate flair.

Start off by melting some candy melts in the color and flavor of your choice.  Melting directions are on the package.


Stir until there are no lumps.  Spoon into a quart size freezer bag.  I realize this is the most unappealing picture!

Snip off the very end of the bag.

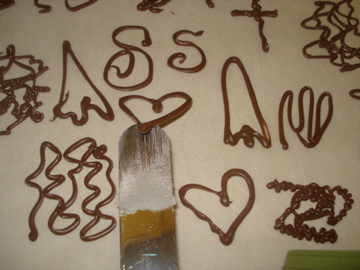
Now's the fun part!  Lay out some parchment or wax paper and start doodling!


Leave them sitting out until they harden.  You could even stick them in the fridge to speed it up.

Once they've hardened, carefully lift off the design with a spatula.

And now, prepare to be amazed!


Remember cupcake wrappers?  
I tried to copy something I saw somewhere using trees against a cake.
Eh...I don't know.  Maybe if I spent a little more time on it.

This was so much fun!  Just be careful because they are obviously very fragile.  I broke a few along the way so I would suggest making extras of the design.

Related Posts with Thumbnails